News Center

To Konw More Our Company News and Exhibition Topics Here.
glass insulator inspection,glass insulator buyer

What Are The Detailed Inspection Steps for Glass Insulators?

Date:2025-09-22Tags:glass insulator inspection,glass insulator buyer
I. Sampling Inspection Upon Arrival
This process is conducted after the insulators arrive at the warehouse or construction site. The purchaser, constructor, and supervisor jointly participate in sampling inspections according to sampling standards to evaluate the quality of the entire batch.

Visual Inspection
Method: Randomly select a certain number of insulators from the batch (sampling ratio as per standards or contract) for visual inspection by examiners using magnifying glasses if necessary.

Content:
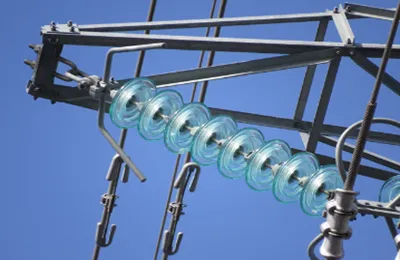
Glass Shell: Check for cracks, bubbles, impurities, scratches, or edge chips. The glass surface should be smooth with a uniform tempered layer.
Metal Fittings: Inspect the cap and pin for rust, burrs, uneven galvanization, cracks, or deformation.
Cement Filling: Ensure the cement is fully filled, without cracks or looseness.
Locking Pin: Check the type and material of the locking pin (e.g., R-pin, W-pin) for correctness, deformation, or rust. Test assembly to ensure smooth insertion, removal, and effective locking.
Marking: Verify that the markings on each insulator (manufacturer's trademark, year of production, rated mechanical load, etc.) are clear, durable, and accurate.

Sampling Inspection


Dimensional and Deviation Check

Method: Use calipers, micrometers, height gauges, and other measuring tools.
Content: Measure key dimensions such as total height, shed diameter, and creepage distance to ensure they comply with the tolerance ranges specified in the standard drawings.


Temperature Cycle Test

Purpose: To evaluate the insulator and its cemented parts' ability to withstand rapid temperature changes and assess thermal stability.
Method: Cycle the sample between hot (e.g., +70°C) and cold (e.g., -30°C) water baths several times. Then, perform a mechanical load test in hot water or measure its residual strength to check for damage or strength reduction.

Temperature Cycle Test


Mechanical Failing Load Test

Purpose: To verify that the mechanical strength of the insulator meets the rated value.
Method: Apply gradually increasing tensile or bending load to the sample using a dedicated testing machine until failure. Record the failing load value, which should not be less than its Specified Mechanical Load (SML).

Mechanical Failing Load Test


Electro-Mechanical Failing Load Test

Purpose: To test the comprehensive performance under simulated operating conditions by applying high voltage simultaneously with mechanical load.
Method: Apply a specified high voltage (usually power frequency AC voltage) to the sample while gradually increasing the mechanical tensile load until failure. No puncture or flashover should occur during the test.


Puncture Withstand Test


Purpose: To examine the intrinsic electrical insulation strength of the insulator's dielectric material, ensuring it does not break down under high voltage.
Method: Short-circuit the metal parts (cap and pin) of the insulator and immerse it in insulating oil. Apply a specified high voltage between the short-circuited metal parts and an external electrode for a duration without causing puncture.

Puncture Withstand Test


Thermal Shock Test

Purpose: Specifically for toughened glass insulators, to check the quality of the tempering. Poorly tempered glass will shatter completely under thermal shock.
Method: Heat the sample in a furnace to a specific temperature, then quickly immerse it in cold water. Observe if the glass shell breaks (properly toughened glass should remain intact).

Thermal Shock Test


Zinc Coating Test

Purpose: To check the quality and thickness of the zinc coating on metal fittings, ensuring corrosion resistance.
Method: Measure the coating thickness using a magnetic thickness gauge or perform a copper sulfate immersion test to check uniformity.

Zinc Coating Test

II. On-site Acceptance & Pre-installation Inspection
This stage occurs before installation and requires a 100% inspection of every single insulator to ensure all products installed on the tower are qualified.

Piece-by-Piece Visual Inspection
Content: Same as the visual inspection in "Sampling Inspection Upon Arrival," but must be performed rigorously on every insulator. Pay special attention to any new impact damage that may have occurred during transportation and handling. Any defective insulator must be immediately rejected and is strictly prohibited from installation.

Piece-by-Piece Insulation Resistance Test
Method: Under dry and sunny weather conditions, use a 5000V megohmmeter (insulation resistance tester) to measure the insulation resistance of each insulator individually. Connect the high-voltage terminal of the megohmmeter to the pin and the earth terminal to the cap.

Pass Criteria:
For 500kV and above voltage classes: Insulation resistance value ≥ 500 MΩ
For 330kV and below voltage classes: Insulation resistance value ≥ 300 MΩ

Locking System Check
Method: Manually install and remove the locking pin to check for smooth insertion, reliable locking, and easy removal. Ensure the opening angle of the locking pin meets requirements to prevent dislodgement due to vibration during operation.
III. Periodic Inspection During Operation
This stage involves planned regular inspections after the insulators are energized, aiming to promptly identify deterioration, defects, and contamination to ensure line safety.

Routine Patrol
Method: Linemen patrol using binoculars, drones, or other equipment from the ground or air.

Content:
Self-Breaking Check: Check for self-shattering (auto-fracture) of glass insulators. After self-shattering, the glass sheds break, but the residual core maintains some mechanical strength. Discovered self-shattered insulators should be replaced promptly according to maintenance procedures.
External Damage: Look for burn marks caused by lightning strikes or flashovers, or damage from external forces.
Contamination Level: Observe the level of contamination accumulation on the insulator surface to inform cleaning schedules.
Locking Pin Status: Check for missing or severely corroded locking pins.


Pole/Tower Climbing Inspection

Method: Maintenance personnel climb the tower for close-range inspection of the insulator string during power outages or live-line working.
Content: Perform a more detailed repeat of the routine patrol checks, including inspecting the cement filling for cracks and assessing increased corrosion of metal fittings.
Insulation Resistance Measurement (In-service)
Method: Typically performed live using the spark gap method or voltage distribution measurement method.
Spark Gap Method: Use an adjustable spark gap probe to measure each unit in the string. When the gap is adjusted to the specified value, a healthy insulator will produce a discharge sound; absence indicates a zero or low-resistance unit.
Voltage Distribution Method: Use a resistive or capacitive voltage divider probe to directly measure the voltage across each unit. Compare the measured value with the standard distribution voltage. Units with abnormally low or zero voltage are considered deteriorated. For glass insulators, this item is primarily for verification due to their self-shattering characteristic making zero-value units easily visible.

Infrared Thermography Inspection
Purpose: To detect abnormal hot spots, such as localized heating due to deteriorated units, poor internal contacts, or heating caused by leakage current from severe surface contamination.
Method: Scan the energized insulator string with an infrared thermal imager and observe the temperature distribution pattern.
Judgment Criteria: Compared to other healthy units in the same string, a deteriorated insulator usually shows a lower temperature (increased resistance reduces current and thus heating); whereas poor connections or severe contamination cause higher temperatures at those specific points.

The inspection of glass insulators is a lifecycle quality control process crucial at every stage—from arrival and installation to operation. Strict inspection is a vital cornerstone for ensuring the safety, stability, and reliability of the power grid. All inspection work must strictly adhere to the latest national and industry standards, as well as safety management regulations.
We use cookies and other tracking technologies to improve your browsing experience on our website, to show you personalized content and targeted ads, to analyze our website traffic, and to understand where our visitors are coming from.